Restoring bricked Caddx Turtle after failed firmware update
If you have failed to update the Caddx Turtle firmware, then you’ll probably have “bricked” device that refuses to work (black screen, no video out, no reaction to buttons, etc). Don’t be upset and don’t throw it away – it is relatively easy to restore the firmware by using the Arduino board.
Hardware
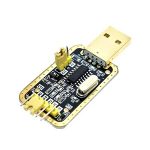
USB to TTL adapter. Better get one with 3.3V option. I have tested the cheap CH340G adapters and they work flawlessly, therefore I recommend them.
(Possible variants on ebay: https://www.ebay.com/sch/i.html?_nkw=USB+to+TTL+CH340G+3.3V)
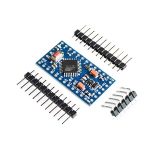
Arduino Mini Pro with Atmega328P. Probably any Atmega328 based Arduino board should fit, just have in mind that we need 3.3V power supply and logic levels.
(possible variants on ebay: https://www.ebay.com/sch/i.html?_nkw=Arduino+Mini+Pro+atmega328)
Software
You can download all the software in one package here: http://bit.ly/Google-Drive-Caddx-Turtle-Firmware-Flashing or you can download the individual packages from the list down below:
-
- Flashrom programming utility (https://www.flashrom.org ). If your PC runs on Windows then I recommend to download already compiled windows version here: http://ra.openbios.org/~idwer/flashrom/mingw/ (Edit: link seems to be dead now, but we have it saved on Internet Archive: https://web.archive.org/web/20181112215901/http://ra.openbios.org/~idwer/flashrom/mingw/)
- XLoader to upload binary file to Arduino board (http://russemotto.com/xloader/ ) (alternative link: http://www.hobbytronics.co.uk/download/XLoader.zip)
- Arduino firmware [frser-duino.hex] (download link: https://drive.google.com/file/d/0BxZ43kLDo-GFOWJnQ19HYWVZVmc/view)
- Caddx Turtle firmware flash dump file [flash.hex] (download link: https://bit.ly/Goggle-Drive-Caddx-Turtle-Firmware-Dump-files)
Note! It seems that the Caddx has changed the Turtle Cam sensor board for the latest batches and you should pay attention what firmware you are uploading. There are two firmware files: for old sensor board and the new sensor board. The provided firmware may not work for particular your version of Caddx Turtle. Do the firmware backup!
Procedure step by step
First you need to flash Serprog firmware to Arduino Mini Pro:
- Connect USB – TTL converter to Arduino Mini Pro board
- If everything is ok, You should see “FTDI” or “USB-SERIAL CH340” device in device manager
- Connect Arduino Mini Pro to USB-TTL adapter (check that your FTDI or USB Serial adapter uses 3v for powering)
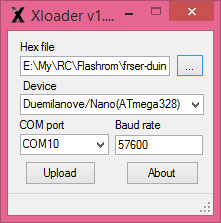
- Start Xloader, open [fser-duino.hex] file, set the COM port and hit “Upload” (tip: Press and hold Reset button on the Arduino board and release right before you hit the “Upload” button).
Now You have Flashrom compatible programmer.
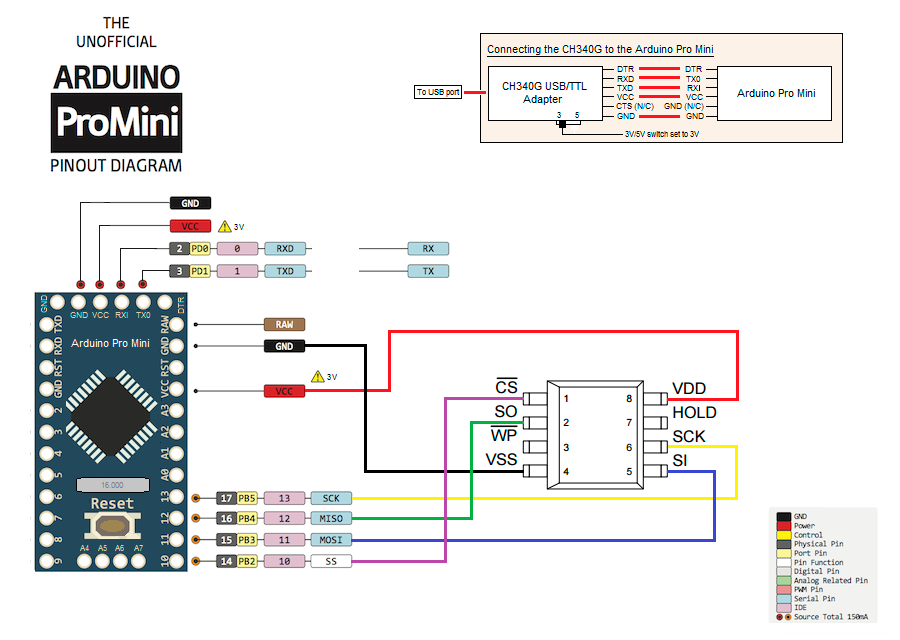
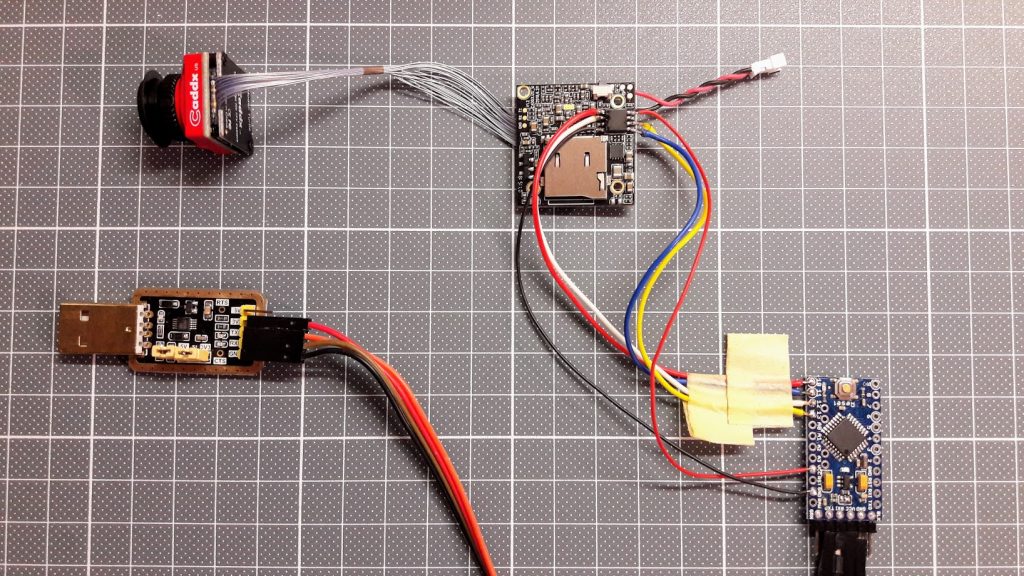
Connect the Turtle serial flash IC to the Arduino. Use supplied connection schematic. Solder 6 wires: VCC, GND, CS, CLK, MOSI and MISO. Try to keep them as short as possible, better about 10cm. Use small diameter wire.
Connection table:
| FLASH CHIP | ARDUINO BOARD |
|---|---|
| VCC (pin 8 ) | 3.3V output (5V can kill the board!) |
| GND (pin 4) | GND pin |
| CS (pin 1) | pin 10 |
| MISO (pin 2) | pin 12 |
| MOSI (pin 5) | pin 11 |
| Clock (pin 6) | pin 13 |
Connection schematic:
Caddx Turtle Flash chip connected to the Arduino board should look like that:
Do not power the Caddx Turtle board with alternative power source. It should be left only connected to Arduino board.
Once you have everything connected, try reading the contents of flash IC by running this command in Windows Command prompt:
mingw32-w64-flashrom-r1781.exe --programmer serprog:dev=COM7:115200 -c MX25L6445E --read test.hex
Here in the parameter --programmer serprog:dev=COM7:115200 change COM7 to whatever COM number your USB-TTL adapter has.
You should get similar output to this:
E:\My\RC\Flashrom\Caddx.Turtle>mingw32-w64-flashrom-r1781.exe --programmer serprog:dev=COM7:115200 -c MX25L6445E --read test.hex

flashrom v0.9.7-r1781 on Windows 6.2 (x86)

flashrom is free software, get the source code at http://www.flashrom.org
Calibrating delay loop... OK.

serprog: Programmer name is "frser-duino"

Found Macronix flash chip "MX25L6445E" (8192 kB, SPI) on serprog.

Reading flash... done.
Be patient – reading 8Mbytes of the data takes ~ 10 min.
If everything goes OK by this far, you are ready to flash the firmware. To flash the device, start this command:
mingw32-w64-flashrom-r1781.exe --programmer serprog:dev=COM7:115200 -c MX25L6445E --write flash.hex
You should get similar output to this:
E:\My\RC\Flashrom\Caddx.Turtle>mingw32-w64-flashrom-r1781.exe --programmer serprog:dev=COM7:115200 -c MX25L6445E --write flash.hex
flashrom v0.9.7-r1781 on Windows 6.2 (x86)flashrom is free software, get the source code at http://www.flashrom.org
Calibrating delay loop... OK.
serprog: Programmer name is "frser-duino"

Found Macronix flash chip "MX25L6445E" (8192 kB, SPI) on serprog.
Reading old flash chip contents... done.
Erasing and writing flash chip... Erase/write done.
Verifying flash... VERIFIED.
Note: Flashing 8Mbytes of the data takes a lot of time – be patient. Arduino flashing device uses slow SPI connection with 115200 baud rate. (approx 14kb per second, or 840kb per minute) so it takes about 10 min to read, 20 min to erase-write and 10 min to verify…
Note: Caddx Turtle can not boot normally while the Arduino board is connected. Options – you can disconnect the wires after the flashing or you can hold the reset button on the Arduino board while the Caddx Turtle is booting to check if everything is working after the flash process.
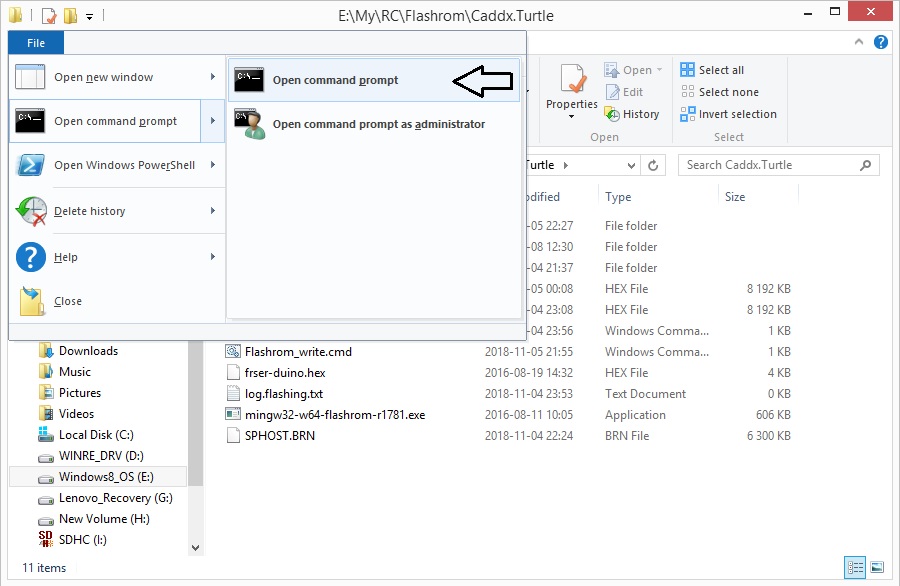
Note: Windows command prompt can be opened by selecting the File – Open command prompt from the file explorer menu.
You are done! You have successfully restored the firmware.
If you have questions or you need more details, then leave a comment below.
Mandatory disclaimer: Do it on your own risk. Flashing the firmware can result in bricking your device.


Hello Montis Christopher!
tryed it – do not work….
if i but in CLI:
D:\>Modellbau-software\Frsky-Firmware\mingw32-w64-flashrom-r1781.exe –programmer serprog:dev=COM5:115200 -c MX25L6445E –read test.hex ..I get this answer: D:\>Modellbau-software\Frsky-Firmware\mingw32-w64-flashrom-r1781.exe –programmer serprog:dev=COM5:115200 -c MX25L6445E –read test.hex
flashrom v0.9.7-r1781 on Windows 6.2 (x86)
flashrom is free software, get the source code at http://www.flashrom.org
Calibrating delay loop… OK.
Error: cannot synchronize protocol – check communications and reset device?
Error: Programmer initialization failed.
I connected everything like you did but i use an FTDI CP2102.
Help please!
Hi, Michael,
Flashrom output says it cannot communicate with the Arduino. The reasons can be wrong oscilator frequecy (we need Aduino Pro Mini with 16Mhz Atmega328), can be that something went wrong when flashing the flashrom firmware into the Arduino (frser-duino.hex). Have you successfully flashed the frser-duino.hex file?
Hi Montis!
Thanks for answer!
How can i controll if the flashroomfirmware is correct installed on Arduino?
Damned it has only 8Mhz, i have to order a new one…. shit…. will tell you when it arrives, if it work then!
THX for ja help!
The only known method to check if the flashrom firmware does work is to run the Flashrom from command line
mingw32-w64-flashrom-r1781.exe –programmer serprog:dev=COMX:115200
It should probe the programmer and should return no programmer initialization errors.
Also try running from the same command line, but with the twice slower speed (16MHZ->8MHZ : 115200->57600):
mingw32-w64-flashrom-r1781.exe –programmer serprog:dev=COMX:57600
Maybe this will work.
With 16 Mhz Arduino it worked.
Thank you very much…
Do you know if this hex-file ist the latest version?
Great work, Montis!
Best regards
Michael
That HEX file is the dump from the latest known firmware to date (7 Sep 2018). I’m really glad it helped!
To read the IC do you run the commands in the windows command bar?
Yes, either you need to open the command prompt or edit the supplied batch file (Flashrom_write.cmd)

Flashing utils package can be downloaded here: http://bit.ly/Google-Drive-Caddx-Turtle-Firmware-Flashing
Command prompt can be opened from here:
Thanks for this, hoping to complete this tomorrow. Just one more question, how does the BRN file get uploaded to the chip? Does it matter where you save it on your computer or is it part of the frser hex? Sorry for the questions but very seldom do this type of fix on electronics, I’m more a hardware person.
SPHOST.BRN file is firmware upgrade file for upgrading via SD Card. You need *.HEX firmware dump file to upload via Arduino serial flash uploader.
So *.BRN files – SD Card, *.HEX – Arduino flasher.
Do I just have to rename brn to hex ?
No. BIN and HEX files are not the same. Use BIN file to updated via SD card and HEX file to flash the firmware directly into the serial flash memory chip with arduino.
Hi,
Followed as per the instructions, uploaded the HEX file to the Mini Pro fine, connected as per the diagram however when I try and read the HEX I get the following (also checked my com port is 7)
Would it make a difference me using a FTDI USB to TTL Serial Converter Adapter FT232RL Module 5V and 3.3V Arduino ARM rather than the USB To RS232 TTL CH340G Converter Module 5v 3.3v Serial Port Module you suggested?
“PS C:\Users\jason\Desktop\Caddx.Turtle> mingw32-w64-flashrom-r1781.exe –programmer serprog:dev=COM7:115200 -c MX25L6445
E –read test.hex
mingw32-w64-flashrom-r1781.exe : The term ‘mingw32-w64-flashrom-r1781.exe’ is not recognized as the name of a cmdlet,
function, script file, or operable program. Check the spelling of the name, or if a path was included, verify that the
path is correct and try again.
At line:1 char:1
+ mingw32-w64-flashrom-r1781.exe –programmer serprog:dev=COM7:115200 – …
+ ~~~~~~~~~~~~~~~~~~~~~~~~~~~~~~
+ CategoryInfo : ObjectNotFound: (mingw32-w64-flashrom-r1781.exe:String) [], CommandNotFoundException
+ FullyQualifiedErrorId : CommandNotFoundException
Suggestion [3,General]: The command mingw32-w64-flashrom-r1781.exe was not found, but does exist in the current location. Windows PowerShell does not load commands from the current location by default. If you trust this command, instead type: “.\mingw32-w64-flashrom-r1781.exe”. See “get-help about_Command_Precedence” for more details.
PS C:\Users\jason\Desktop\Caddx.Turtle>”
Try adding the full path before the “mingw32-w64-flashrom-r1781.exe“. Your Power Shell command line tool does not understand the current location. So your command line should be
C:\Users\jason\Desktop\Caddx.Turtle\mingw32-w64-flashrom-r1781.exe –programmer serprog:dev=COM7:115200 -c MX25L6445E –read test.hex
Thank you, tried that and received this, still not working unfortunately
” PS C:\Users\jason\Desktop\Caddx.Turtle> C:\Users\jason\Desktop\Caddx.Turtle\mingw32-w64-flashrom-r1781.exe –programmer s
erprog:dev=COM7:115200 -c MX25L6445E –read test.hex
flashrom v0.9.7-r1781 on Windows 6.2 (x86)
flashrom is free software, get the source code at http://www.flashrom.org
Error: Extra parameter found.
Please run “flashrom –help” for usage info.
PS C:\Users\jason\Desktop\Caddx.Turtle>”
Pay attention to the command line “C:\Users\jason\Desktop\Caddx.Turtle\mingw32-w64-flashrom-r1781.exe –programmer serprog:dev=COM7:115200 -c MX25L6445E –read test.hex” you have separated the “s” from “eprog:…“
Hi, that was just the way it pasted, in the command line the s s not separated. Really stuck on this 🙁
I also tried on the command prompt and received this?
“C:\Users\jason\Desktop\Caddx.Turtle> mingw32-w64-flashrom-r1781.exe –programmer serprog:dev=COM7:115200 -c MX25L6445E –read test.hex
Access is denied.”
It also says this app cannot run on your PC?
Any help would be appreciated
Not sure what is wrong. Maybe your PC has 32bit OS? Mine Flashrom software is for 64bit. Also you could try to run “Flashrom_read.cmd” and “Flashrom_write.cmd” batch files instead of using command prompt.
Hi Montis,
The system is running a 64bit OS, I tried just running the two batch files however I just get a blue pop up screen saying “this app can not run on your PC” despite running as the administrator.
I also tried on another 64 bit AIO system I had and achieved the same results, anything else you can think of would be appreciated.
Thanks
Here what I’ve found on this topic:
“This app can’t run on your PC” is definitely not Chinese to you, especially if you’re a Windows 8 or Windows 10 users. This feature is called SmartScreen filter. It’s designed to keep you save from malicious programs, web pages and/or websites.
In normal cases, it pops out when Microsoft decides that certain apps you are to open would be harmful to or not appropriate for your operating system.
However, it can be too sensitive sometimes to a point where you can’t even open some of the basic programs which you’re sure to be problem-free.
Not to worry much about it. Annoying as it seems, it’s an easy problem to solve, as long as we find out what cause it. Just follow the instructions below and you will easily get it fixed!
(https://www.drivereasy.com/knowledge/this-app-cant-run-on-your-pc-solved/)
You can try disabling the SmartScreen. This should be enough to run this programm.
hi, why command promp shows ‘mingw32……. is not recognized as an internal or external command’ ?
You should have ‘mingw-w64-flashrom-r1781.exe’ in the same directory(folder) as you are currently trying to run command in. I suggest to use ‘Flashrom_read.cmd’ and ‘Flashrom_write.cmd’ batch files for executing the commands.
Im sorry, i cant find mingw-w64-flashrom-r1781.exe in the flashrom folder. Do i get the wrong dowbloaded files?
Have you tried to download complete package from here: http://bit.ly/Google-Drive-Caddx-Turtle-Firmware-Flashing ? There is definitely Flashrom executable in that package.
Theres no link show above… Any alternate link? I think i need for windows package
How to change the com port. Because im using the com3, and the ‘flashrom_read’ at the com7
Change the contents if the ‘flashrom_read.cmd’ file. Change the highlighted part: mingw32-w64-flashrom-r1781.exe –programmer serprog:dev=COM7:115200 –read flash.hex -c MX25L6445E
It works, write and read done… But no verify.. which flash file to use? Theres 2 files, flash.ok.hex and flash.hex
Use [flash.hex] file from the \Dump files\Sep 7 2018\ folder. This is the latest firmware.
I got a lot of ERASE FAILED.
I flashed successfully one time but the Turtle wasn’t work.
Now I try to flash the older dump, but I always have this kind of errors :
Reading old flash chip contents… done.
Erasing and writing flash chip… FAILED at 0x00000000! Expected=0xff, Found=0x4e, failed byte count from 0x00000000-0x00000fff: 0xfed
ERASE FAILED!
Reading current flash chip contents… done. FAILED at 0x00000000! Expected=0xff, Found=0x4e, failed byte count from 0x00000000-0x00007fff: 0x6a66
ERASE FAILED!
Hard to say what’s wrong. Double check the wiring, try to read the flash contents form the Turtle. If you cant read sucessfuly, then it will not succeed in writing.
read done, but when read I have this output:
C:\Users\NAMJU>C:\Users\NAMJU\Documents\Caddx.Turtle\mingw32-w64-flashrom-r1781.exe –programmer serprog:dev=COM15:115200 -c MX25L6445E –write flash.hex
flashrom v0.9.7-r1781 on Windows 6.2 (x86)
flashrom is free software, get the source code at http://www.flashrom.org
Calibrating delay loop… OK.
serprog: Programmer name is “frser-duino”
Found Macronix flash chip “MX25L6445E” (8192 kB, SPI) on serprog.
Error: opening file “flash.hex” failed: No such file or directory
can u help me?
Looks like your programmer detects the serial flash chip correctly. You need to put the correct Flash.hex file into directory where you run program from.
i have the same problem too, Error: opening file “flash.hex” failed: No such file or directory i copy the “flash.hex” from dump folder/sept out to the same folder as the mingw32-64… but still it said no such file
You should make sure that you are running the command line in the same directory as flash.hex is. Try running Flashrom_write.cmd command file.
Hello
could this procedure also work for turtle v2?
Should work also for Turtle V2. The firmware is the same.
thank you so much,
as soon as I get the material I will try!
(forgive the bad english)
Good luck and don’t forget to post your results here!
Hello,
I got everything I needed, I tried to read the chip, but I returned the error “cannot synchronize the protocol -check communications and reset device?”.
I noticed that the number engraved on the chip is MX25L3433F, which is not on the list of compatible chips …
is there any way to get it back anyway?
thank you!!
The chip is most likely is the MX25L6433F. Try running the Flashrom without the -C option. It should autodetect the flash chip.
Also double check the wiring.
Hello Montis,
Thanks for the description. I did everything as listed, unfortunately on my board the MX25L6433F and the same problem as “DocNsanE”.
The MX25L6433F is not recognized by the Flashrom. Even if I omit the -c option, I always get the message that the hardware is incompatible with Flashrom.
Obviously, “Flashrom” stops working if the hardware is not listed in the chip list. Can the chip be added to the list?
Is it possible to set a current “mingw32-w64-flashrom-r1781.exe” V 1.0? I am not a programmer myself.
I do not know how to continue! Or I have to buy a new Caddx Turtle V2 board.
Unfortunately I have only the Turtle V1 board, so cannot test this.
Probably we will need the newest Flashrom (V1.0) compiled for Windows. Also you can try to force reading/writing by adding the ‘-f’ to the command line.
Edit: Also please try this Flashrom https://drive.google.com/open?id=1976PHoSa_JhkM-9hgsBnaKP60x9aOOGQ
Damn, tried it, but the chip just isn’t supported yet in the flasrom prog.
Also tried the force and deducting the –c to autodetect the chip but the output is the same (communication error)
Unfortunately, the problem with the other flashrom is not resolved either. The -f option was also unsuccessful.
E: \ My> flashrom-v0.9.9-86-gd051d86.exe -p serprog: dev = COM7: 115200
flashrom v0.9.9-86-gd051d86 on Windows 6.2 (x86)
flashrom is free software, get the source code at https://flashrom.org
Calibrating delay loop … OK.
serprog: Programmer name is “frser-duino”
serprog: requested mapping AT45CS1282 is incompatible: 0x1080000 bytes at 0xfef80000.
serprog: MX25L25635F / MX25L25645E / MX25L25665E is incompatible: 0x2000000 bytes at 0xfe000000.
serprog: requested mapping MX66L51235F is incompatible: 0x4000000 bytes at 0xfc000000.
serprog: requested mapping N25Q256..3E / MT25QL256 is incompatible: 0x2000000 bytes at 0xfe000000.
serprog: requested mapping N25Q512..3E / MT25QL512 is incompatible: 0x4000000 bytes at 0xfc000000.
serprog: requested mapping W25Q256.V is incompatible: 0x2000000 bytes at 0xfe000000.
No EEPROM / flash device found.
Note: flashrom can never write if the flash chip is not found automatically.
Other messages: “Hardware not compatible with chip list”
Last attempt should be the new Flashrom V1.0. Can someone provide that?
Problem solved!!
The Arduino board got too little power (2.14V) from the USB-TTL adapter PIN 3.3V.
3.6 V was then transferred from the VCC PIN and the chip was detected:
Multiple flash chip definitions match the detected chip (s): “MX25L6405 (D)”, “MX25L6406E / MX25L6436E”, “MX25L6445E”
Subsequently, the reading and writing of the chip was possible without any problems.
Unfortunately, the Turtle Board V2 could not be repaired, it seems to be another mistake.
Thanks for quick help.
Nice debugging and thumbs up for the confirmation that it works on Turtle V2! Unfortunately firmware failure is not always the reason of faulty board. If your board stopped working after the quad crash you may try to make reflow process (applying flux, heating with a heat gun up to the solder melting point) for the main chip.
Same problem here with the MX25L6433F chip, its just not support (yet).
Tried the force options and deducting the -c option, but same same….DAMN!
A reflow process main chip was heated with a heat gun – has brought a partial success.
The board is active, but without OSD display, then firmware update SPHOST.BRN installed (start of update: blue LED flashes, after approx. 30 s the LED goes out), OSD still inactive.
Video recordings can be started and stopped via the button on the board and also via the OSD joystick.
Great. At least its a partial success.
Hey man, just wanted to say thank you – managed to recover my out-of-the-box bricked Turtle v2 using an arduino nano, some wires and your instructions. Thanks!
Thank you for the feedback. I’m very happy it helped!
Hi man, do you think this one could be ok?
https://www.amazon.it/gp/product/B078H9RMZY/ref=ppx_yo_dt_b_asin_title_o00_s00?ie=UTF8&th=1
If yes, in the steps, I see you chosed “Duemilanove/Nano(ATmega328)” in Xloader. Will it be the same with the boad linked?
Thanks in advance
Yes, almost any Arduino board with Atmega328P MCU should work. This one should work also and is cheaper: https://www.amazon.it/Microcontroller-Atmel-ATMEGA328P-Compatibile-Arduino/dp/B01DUSDQQ8/ref=sr_1_1_sspa
Isn’t there any ATmega328P MCU board with integrated usb port that could work?
Montis, i’m receiving this message:
Calibrating delay loop… OK.
Error: cannot synchronize protocol – check communications and reset device?
Error: Programmer initialization failed.
What’s wrong?
Board already flashed with xloader and com port is ok
Changing the ttl adapter it worked.
Finally resurrected my Turtle V2
Thanks again, Montis!
hi.
in the last step, after reading old flash chip contents…done
i see erasing and writing flash chip…
but after several hours it’s never done
do you have an idea of what can i try?
tnks
Reading and flashing takes time, but erasing-writng stage should take about 20min. If it fails eventually, try measuring the power supply voltage. Should be +3.3V. Someone was failing to flash because the supply voltage was too low.
Hi, thx worked really well. Have done it with adruino nano, so the CH340G Adapter isnt needed. Just flashed the nano with xloader directly.
First had props with initialication of the rom, just switched to another GND and then it worked flawless.
Thx for your work.
Thank you for your feedback! I’m happy it helped!
Hello just trying this finally got it reading and writing but when its read the flash the erase and write says done after 1 second and verifies it for another 10 mins with success but tried it and still black screen with only OSD showing from my vtx running it again but weird how it seems to skip the erase and write part
Hello again i finally got it flashed after reading all the comments i noticed that it should be 16bit i had a 8bit one so halved the value 57600 and flashed properly this time and now powering up and fully working. Thank you for this tutorial even though it was driving me to dispare learning all this it now something i can say i have managed to do. Thank you Sir 🙂
Thank you for your feedback! I’m glad this helped you.
Thanks Montis!!!! Saved another one 🙂 I ended up using a arduino uno so instead of the ttl converter I just plugged it directly into PC using USB. I ended up powering the board with 12v becasue Iw as getting some errors sO i made sure to use the 3.3V outputs and everything went great. After it was finished I used the sd card to update the firmware to the newest version and got runcam protocol working great 🙂 Thanks again
Thank you for your feedback! You have managed to hack the Caddx Turtle and now you can be called hardware hacker 🙂
Hi! can you please post a link to the latest firmware.
As well please mention if it is for turtle v1 or v2 camera.
Thank you!
All turtle firmwares (so far) are compatible with both versions V1 and V2. I have only two firmware update files. They are in the folder “Firmares” in this archive: http://bit.ly/Google-Drive-Caddx-Turtle-Firmware-Flashing
Hi, i am just wondering wether this could be do with arduino pro micro with atmega 32u4
Andre, I’m not sure in this. There are two potential problems – one is Flashrom firmware is compiled for Atmega328 MCU and might not work for Atmega32U4, another potential problem is you need to supply 3.3V to to Arduino board not to exceed the maximum power ratings for the Caddx Turtle board.
Hello Montis,
Thank you for your detail guide, I went through all the steps but it is still blank screen. The led is not solid red but still in between red & blue (see picture). Mine come with a loose capacity so maybe its the reason cause, just wonder if you could have a look on your board and see if you could identify that capacitor.
https://imgur.com/a/NYt8jVn
Thanks.
That missing capacitor is definitely the reason of the black screen. Try to resolder similar size capacitor. The exact value might not be so important.
Read the same black screen story here (post #2) : https://www.rcgroups.com/forums/showthread.php?3100705-Caddx-Turtle-new-Split-type-camera
I tried 2 different capacitors from my vtx but no luck. The camera works on other board.
Hi Montis..
Thanks for the guide! I managed to save my Turtle V2. I tried using the Arduino Mini pro, but it didn’t work because I bought the 8Mhz version. The Xloader just stayed on Uploading status for over half an hour. Since I didn’t want to buy another one, and wait another 2-3 weeks, I used my old Arduino UNO since it’s 16Mhz. Using the UNO, it only took a second to upload frser-duino with Xloader. After, easing and writing the firmware to the Turtle board, it failed the Verifying Flash stage. However, when I connected the battery to my quad, the Turtle still worked, so that was great! I immediately took a SD card and updated the firmware to the latest version. I read in the comments above, there was another person with great success using the Arduino UNO. Anyway, you are a lifesaver, thanks again!!
Thanks for your feedback! Good to know that this helps.
Montis, thanks a lot.
You are only in the world, who made this instruction!! At least i dont find anywhere else)) I lost hope,when i bricked my turtle, but this method help me.
I use Arduino nano v3, on ATmega 328, with built in TTL. But it have 5v logic, so i use 5to3.3v 2way logic level converter.($1)
I flash chip from first attempt!!
Only error i have, on reading stage nothing happend, so i reset arduino, and start again. All OK. Its WORKS!!!
Thanks for your feedback. Good to know it still helps someone!
Montis. thanks a lot for great info you shared. you are hero my caddx still stuck at yellow page but i am glad i did all steps successfully according to instruction. all weldone, reading writing and finally verified successfully. i dont know what happened with my camera. its caddx turtle v2. any advice would be greatly appreciated. thanks alot
Thanks for your comment, ali. You made a great job reflashing the turtle firmware. However it looks like your Turtle problem is not in the firmware. Take a look at this guide on how to fix the Caddx Turtle Yellow Screen of death: http://www.multirotorguide.com/guide/caddx-turtle-yellow-black-screen-issue-fix/
Try the recommended steps. Good luck!
Thank you Montis for this instructions. Sadly I got a problem at the beginning. After Connecting the Arduino to the CH340G adapter I’ve connected everything to my PC.
It found the board and named “USB-SERIAL CH340” as you described. After I started the Xloader and tried to upload the .hex file but the Xloader stucks after hitting the “Upload” button.
It just says “Uploading…” and stays like that till I end the process.
I don’t have any knowlage about arduino so I was just following the steps. Can you, or anyone else help?
Thanks in advance
You can try keeping the reset button on the arduino and releasing it right on the moment when you hit Upload button on XLoad utility. Try various timings. This could help.
Hi,
I’m not able to find Arduino Pro Mini 3.3V with 16MHz clock. Do such board exist?
Hi, I have managed to find such Arduino Pro Mini with selectable (solder pads) 3.3V/5V regulator and 16MHz crystal.
Actualy you can use any 5V/16MHz Arduino Pro Mini, just power it from 3.3V USB-Serial adapter. It should work. The Atmega328 datasheet says it is recommended to power Atmega with 5V if running 16MHz, but in reality it works perfectly with 3.3V.
Also in your connection diagram there is DTR from ttl converter to DTR on Arduino, but Pro Mini does not seem to have such pin. Any ideas?
DTR signal is not necessary, but in this case you’ll definitely have to fiddle with resetting the Arduino board before loading the fser-duino.hex with XLoader. In fact DTR reset was not working on my chineese Arduino boards I have tried. Or maybe it is USB-TTL serial adapters that don’t work properly with DTR signals. Don’t know and don’t care – it works without DTR.
C:\rc>mingw32-w64-flashrom-r1781.exe –programmer serprog:dev=COM7:115200 -f
flashrom v0.9.7-r1781 on Windows 6.1 (x86)
flashrom is free software, get the source code at http://www.flashrom.org
Calibrating delay loop… OK.
serprog: Programmer name is “frser-duino”
Found Generic flash chip “unknown SPI chip (RDID)” (0 kB, SPI) on serprog.
===
This flash part has status NOT WORKING for operations: PROBE READ ERASE WRITE
The test status of this chip may have been updated in the latest development
version of flashrom. If you are running the latest development version,
please email a report to flashrom@flashrom.org if any of the above operations
work correctly for you with this flash part. Please include the flashrom
output with the additional -V option for all operations you tested (-V, -Vr,
-VE, -Vw), and mention which mainboard or programmer you tested.
Please mention your board in the subject line. Thanks for your help!
No operations were specified.
Double or triple check your cabling, maybe you have some wires mixed up. Also have your wires as short as posssible ~10 cm is the upper limit for reliable communication. You could shorten the longer cable to avoid problems.
Also you should not power your Caddx Turtle by external power. Let the power be supplied by ST-Link dongle’s 3.3v output.
hi, i have a brand new caddx turtle v2 and i wanted to flash the new firmware via SD card.
Unfortunately I now have a yellow screen.
I have carried out your application three times, everything went through properly. But the yellow screen stayed.
Do you have any other ideas?
greeting
stefab
There are other possible reasons for yellow screen. Have a look at this article:
Caddx Turtle yellow screen issue fix
? What article Montis?
This one: Caddx Turtle yellow screen issue fix
Hi,
Which article do you mean?
ok, i found my problem.
The Cam was dead 🙁
I wrote to the Caddx Support. I hope they send my an new Cam.
But your instructions worked, thanks.
greeting
Stefan
Thank you Montis~! I just saved my turtle V2 by your post! I haven’t flew for a long time until today when I turned on the quad , for some reason it just couldn’t boot with no red light on . When I was going to give up , I came across to your post and I want to give it a shot as I just have the tools you talked about on the post , and after following your instructions and with patience …as I disconnected the arduino and turn it on with 4S lipos ,it turns on with red light on and with the default setting! I think I can use the same method to rescue my broken eachineproDVR as I had left a message on your used post for not knowing how to type commands in Windows systems and no one replied haha .
Thanks for your feedback! I’m really happy this helped to save your Turtle.
Yes, you can try the same method for Eachine ProDVR.
Hi, i recently bricked my hd board. i believe i might have sent 8v to the 5 v input. ive taken the little 6v ic of next to the power input. unmarked. Does anyone know what device is this? Also what could have i blown?
Kind Regards
Hi, I don’t know the exact part number as it is unmarked IC. Most probably it is some kind of voltage regulator, probably 5V->3.3V reg.
Hi guys, i have update via SD card my turtle v2 DVR board and got the yellow screen. I have flashed the hex file with success using a Raspberry Pi but i have the same yellow screen… Before the update via SD the board was working. I don’t know what think about it.. some of you guys have a backup of hex image of the v2 version??
Hello? Im in the same boat. Yellow screen and some of the links the poster posted are not working. I bought the arduino parts but do not have the firmware or a full guide to restore it. I wish I just chucked it in the bin now.
You can download the software from my links in the article. I’ve updated the links.
Hi Montis,
This link http://russemotto.com/xloader/ is also broken.
Cheers
Thanks for the heads up. Unfortunately some websites goes down. You can find the XLoader.exe program via Google search. Also You can download the whole software package from my link on the Google drive.
Microsoft Windows [versão 6.1.7601]
Copyright (c) 2009 Microsoft Corporation. Todos os direitos reservados.
C:\Users\MAURICIO>mingw32-w64-flashrom-r1781.exe –programmer serprog:dev=COM20:
115200 -c MX25L6445E –read test.hex
‘mingw32-w64-flashrom-r1781.exe’ não é reconhecido como um comando interno
ou externo, um programa operável ou um arquivo em lotes.
C:\Users\MAURICIO>
BOA NOITE PODERIA ME AJUDAR AMIGO ELE NAO RECONHECE O COMANDO ,WINDOS 7 32BITS
Windows command prompt can be opened by selecting the File – Open command prompt from the file explorer menu. Open it in the folder you have the Flashrom program copied to. See the notes. Or use the supplied Flashrom_read.cmd and Flashrom_write.cmd batch files.
Microsoft Windows [versão 6.1.7601]
Copyright (c) 2009 Microsoft Corporation. Todos os direitos reservados.
C:\Users\MAURICIO>mingw32-w64-flashrom-r1781.exe –programmer serprog:dev=COM20:
115200 -c MX25L6445E –read test.hex
Acesso negado.
C:\Users\MAURICIO>mingw32-w64-flashrom-r1781.exe –programmer serprog:dev=COM20:
57600 -c MX25L6445E –read test.hex
Acesso negado.
C:\Users\MAURICIO> boa noite tudo bem , agora ele diz acesso negado no prompt de comando?preciso desativar alguma coisa muito obrigado pela atencao.
c:\users\MAURICIO\mingw32-w64-flashrom-r1781.exe nao e um aplicativo win32 valido ,
esse e o segundo erro consegui fazer a primeira parte do programa tranquilo estou com dilficuldade no comando de prompt .
Try this version of Flashrom. I think it is for Win32: https://drive.google.com/file/d/1976PHoSa_JhkM-9hgsBnaKP60x9aOOGQ/view?usp=sharing
Quando vou atualizar o firmware do ,para fazer o flash dá esse erro
Calibrating delay loop….ok
Serprog: Programmer name is ‘freser-duino’
Found macronix flash chip ‘mx25l6445e on serprog.
Error:opening file frash .hex failed: no such file or directory
Obrigado por enquanto amigo
Montis ::::: muito obrigado deu certo ,a minha caddx turtle funcionou , valeu pela ajuda ,, obrigado obrigado.
You are welcome! Congrats, you have just hacked your Caddx Turtle. Good job!
Hi Montis,
Is this method & firmware also work for caddx baby turtle board?
The method is the same for Caddx Baby Turtle. Even the board is the same as regular Turtle (except the whoop version). I don’t know if the firmware is the same for Baby Turtle, though.
Hi, Montis.
I flashed my camera via SD CARD and got a yellow screen.
Xthtp Arduino NANO I successfully change falsh. hex.
But none of the firmware does not help. From the store, version 28 Oct 2019 was installed in the camera.
Who else has other versions of HEX?
Hi, unfortunately I don’t have the HEX dump from the new Caddx turtle board. Maybe someone on the RCGroups could help?
please share with me your hex file share me file hex yo
I had gray screen and ı tried your restoring prosedure. Now ı have yellow screen. I try to update the firmware via sd card but it doesnt start to update. There is no updating screen on goggles. Stuck again :/
If your turtle is relatively new, then it most probably has newer sensor board and needs newer firmware dump. You can find a few firmware dumps in the archive. Try uploading the newest one (Sep 23 2019).
Thank you for everything. I did everything as you say and it worked. In the first one, it gave a warning that the flash.hex file is the same as before and the installation is finished. But it didn’t work. I uploaded the flash.hex (23 September 2019) file the latest version and it worked as you said. Those tx and rx pads not working and the camera getting too hot is driving me crazy. That’s why I killed the board by installing other software. I won’t bother with the camera anymore. Just his work is enough for me.
Great job fixing your Turtle! Thanks for your feedback.
would a esp8266 work? i have one but would be unsure of how to do the pinout. i know its based on arduino?
No, the whole project is build for Arduino board and will not work with ESP8266. ESP is different kind of beast.
Thanks for your guide Montis.
I have been able to repair my bricked turtle v2.
I used windows 10 and had to use very short connections throughout before everything would work.
I used the following devices:
FTDI board set to 3.3v from AZDelivery (Amazon)
Arduino pro-mini 8MHz 3.3v from KeeYees (Amazon)
These command lines on windows Administrator CLI (Powershell):
To do a test read
./mingw32-w64-flashrom-r1781.exe –programmer serprog:dev=COM4:57600 -c MX25L6445E –read test.hex
To write the hex code
./mingw32-w64-flashrom-r1781.exe –programmer serprog:dev=COM4:57600 -c MX25L6445E –write flash.hex
To do another verify just to be sure!!
./mingw32-w64-flashrom-r1781.exe –programmer serprog:dev=COM4:57600 -c MX25L6445E –verify flash.hex
Hope this helps
Philip
Great job and thanks for your feedback.